72# Spike Detector and Stochastic Destroy the Market MT5
Submit by Janus Trader 2025
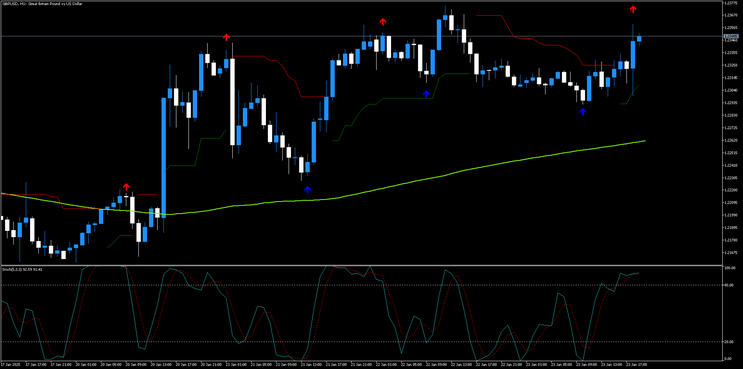
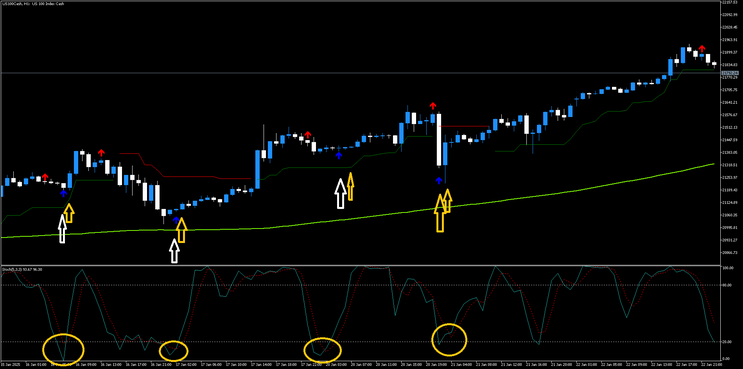
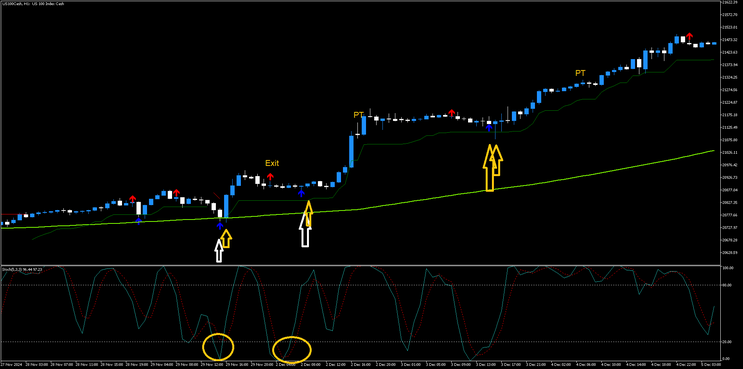
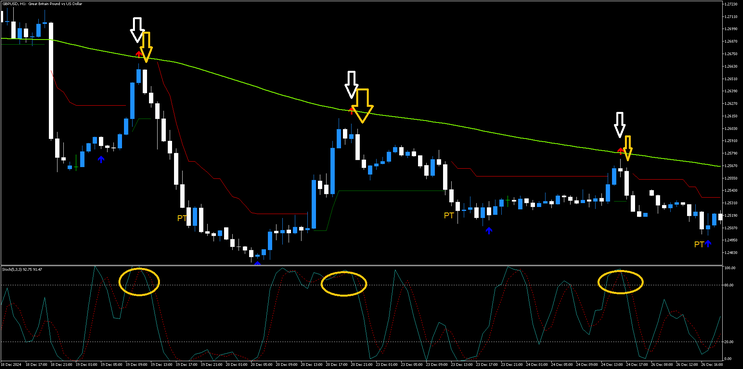
Spike Detector and Stochastic Destroy the Market is a trend-action momentum strategy.
Strategy Setup
-
Time Frame:
-
5 minutes or higher (recommended: M5, M15, or H1).
-
-
Currency Pairs:
-
Any currency pair (can also be applied to indices or commodities after proper testing).
-
-
Trading Platform:
-
MetaTrader 5 (MT5).
-
-
Chart Type:
-
Japanese candlesticks (Renko chart or Range Bar is highly recommended).
-
Indicators Used
-
200-period Simple Moving Average (SMA):
-
Based on the closing price.
-
-
Stochastic Oscillator (5, 3, 3):
-
To identify overbought/oversold conditions and momentum.
-
-
Spike Detector (0, 30, 9):
-
Used to confirm entry points based on the appearance of arrows signaling potential price reversals.
-
-
ATR Trailing Stop:
-
Settings: Multiplier coefficient 2.5, Periods 10.
-
Trading Rules
Trend Direction
-
Trade in the direction of the trend as defined by the 200-period SMA:
-
Uptrend: Price closes above the 200 SMA.
-
Downtrend: Price closes below the 200 SMA.
-
Buy (Long) Entry Rules
-
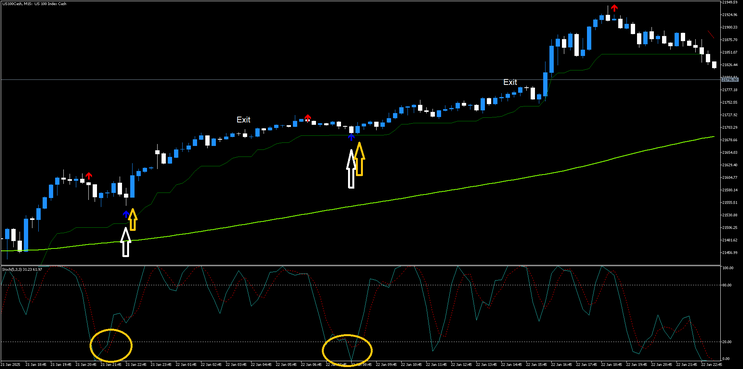
Price closes above the 200 SMA (uptrend).
-
A Spike Detector upward arrow appears.
-
Enter a buy trade when the Stochastic Oscillator crosses upward (from below 20 or within the range).
Sell (Short) Entry Rules
-
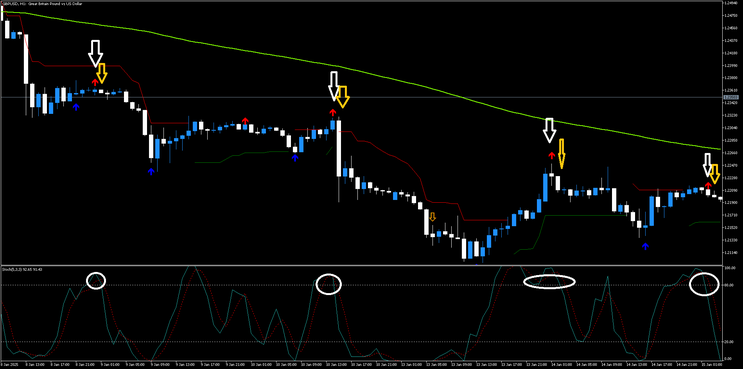
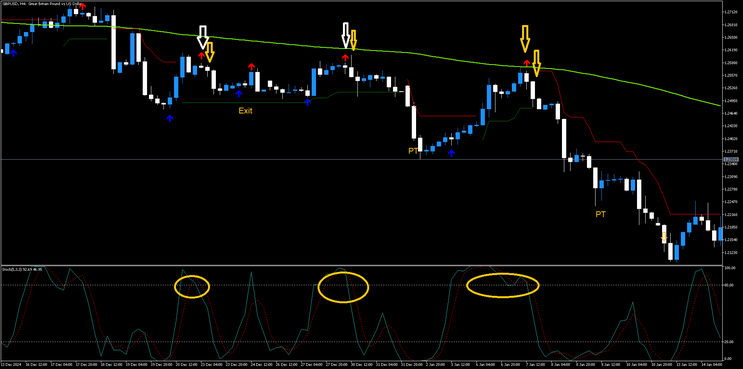
Price closes below the 200 SMA (downtrend).
-
A Spike Detector downward arrow appears.
-
Enter a sell trade when the Stochastic Oscillator crosses downward (from above 80 or within the range).
Exit Rules
-
Close the trade when the opposite arrow from the Spike Detector appears.
-
Exit if the Stochastic Oscillator reaches the opposite extreme (e.g., overbought or oversold).
-
If the trade develops into a strong trend, use the ATR Trailing Stop to follow the price.
Stop Loss
-
Place the stop loss below the previous low (for buy trades) or above the previous high (for sell trades).
Take Profit
-
Set the profit target at a ratio of 1:1 to 1:1.3 of the stop loss, depending on market volatility.
-
Alternatively, follow the position with the ATR Trailing Stop for maximum potential gains.
This strategy combines trend-following, momentum, and pullback entry techniques, making it ideal for volatile market conditions. Always backtest before live trading to adjust for specific market conditions!
72# Rads Reverse MTF HAS Trading System
submit by joy22
(this review write Rad author system)
I have been trading and testing various systems for the past couple of years and have learned a great deal from all the great traders on these boards. I have even shared a few ideas along the way. Now I would like to start a new thread to share what I believe is the best system I have tried so far. It is a compilation of ideas from a number of others but has it's own unique methods.
One of the key parts as some of you may notice is the use of the Heiken Ashi Smoothed indicator and the MultiTimeFrame Bars as used by Don Steinitz. I have found too often that watching the candles themselves leads me to make impulsive trades when I see what appears to be a breakout move. Don's idea to use the HAS with a line graph has helped me settle down and improve my trading. In fact,if you are familiar with his great system you know he works top down.My system is the reverse as it works bottom up! We start on the lower time frame and look to the higher ones for signals.
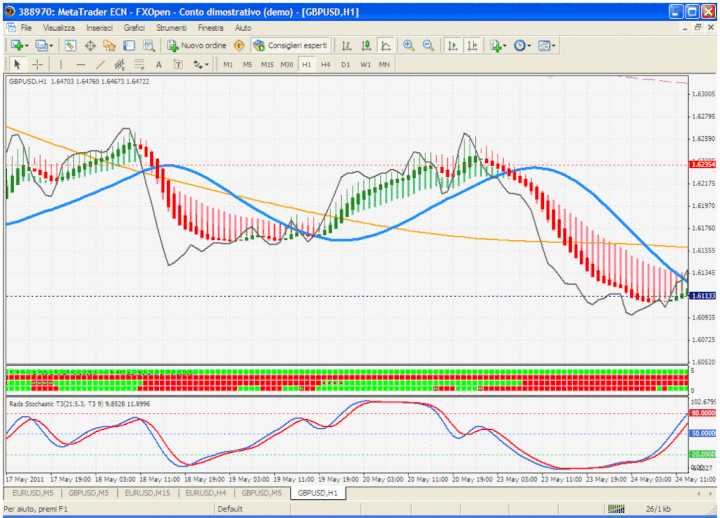
This is a MTF system and you can see on the chart what is going on on the other time frames. Every time frame will show you the current and the next three higher time frames for reference.
The indicators on the chart are:
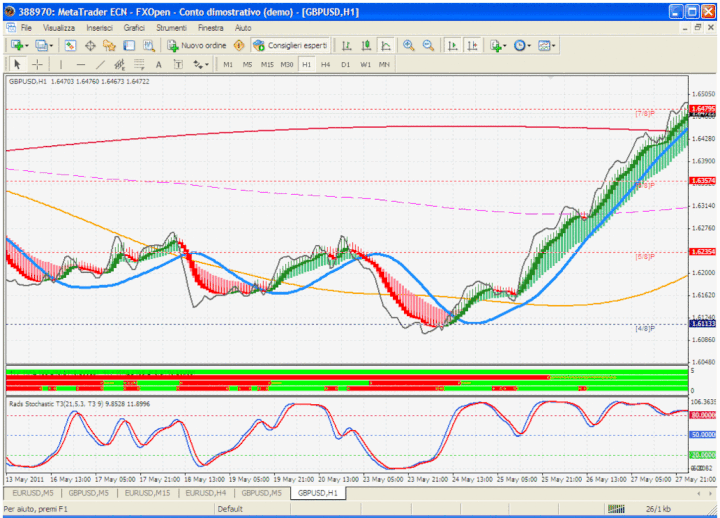
Blue Line - my main indicator. It is a 27 period T3 moving average. I can't explain exactly how a T3 differs but it is much smoother that a regular moving average. As a fan of W. D. Gann, I like his use of the number 9 in his various strategies and I incorporate it wherever possible. Thus the 27 (9 X 3).
Orange Line - 27 T3 on next higher time frame.
Red Line - 27 T3 on next higher time frame.
Purple Line - 27 T3 on next higher time frame.
Maroon Line - 729 EMA. This again is a multiple of 9 (9 X 9). Comparable to the 800 that some others like to use. I find it to be a sort of equilibrium point. Price invariably tends to return to that level. When you see price stalling, check the various time frames and usually you will find that it is the 729EMA on one of them.
Grey line - 2 period smoothed EMA. Represents price action.
HAS and HAS Extension - This gives the main visual indication of the move. I added the extension to help identify false breaks.
Center Window - MTF HAS Bars. These bars show the HAS indicator on the current and next 3 higher time frames.
Bottom Window - T3 Stochastic. Again, somewhat smoother than a regular stochastic. Set to 21-5-3 seems to line up very well with the other indicators.
This is a trend following system and so we look to enter and trade with the current trend on whatever time frame we are looking at. We want to identify reversal points and enter as close to the beginning of a trend as possible and add to our positions when possible.
Reversals are identified by a cross of the T3 accompanied by a color change on the HAS and a matching cross on the stochastics. In order to filter out false trades, look at the Center Window and wait for the first matching color change on the next higher time frame for the entry. When you see all trend lines converge, wait for the breakout indication to take the trade. You will often see all four bars in the center window change color at the same time just as stochastic crosses and a T3 line is crossed. That is a great entry point.
During the move watch for small corrections indicated by a change in color on the HAS but not the extension and on the current MTF Bar. Watch for stochastic to peak and cross back in the original trend direction and for the MTF Bar to resume its original color. This is often a good point to add to your position.
Exits are up to you. I use a combination of Murray Math lines and fib retracements to look for price to stall. Failure to penetrate a higher time frame T3 line or the 729 can also be a good signal to take your profits.
The template is setup to show the correct lines on every time frame so if you are on the 5 min, you will see the 5, 15, 30, and 60 T3 lines. If you are on the 30 min you will see the 30 min, the 60min, the 4hr and the daily T3, and so forth.
The trade system is the same on every time frame but obviously you need to adjust your trade size and stops accordingly. It also works on every pair I have looked.
190# DOLLY + ISAKAS + NINA - Forex Strategies - Forex
284# ISAKAS CS - Forex Strategies - Forex Resources - Forex ...
53# Isakas Sekelper - Forex Strategies - Forex Resources - Forex
172# ISAKAS Rebirth - Forex Strategies - Forex Resources - Forex
173# Trading System, ISAKAS II V.2 - Forex Strategies - Forex ...
171# ISAKAS II - Forex Strategies - Forex Resources - Forex
165# Isakas Osentogg - Forex Strategies - Forex Resources -
335# Dolly 10,11,12 - Forex Strategies - Forex Resources - Forex
190# DOLLY + ISAKAS + NINA - Forex Strategies - Forex
310# Dolly 13 - Forex Strategies - Forex Resources - Forex Trading
257# Dolly 2 - Forex Strategies - Forex Resources - Forex Trading
32# Dolly Modified - Forex Strategies - Forex Resources - Forex ...
318# Ultima Secret V.1 - Forex Strategies - Forex Resources -
339# Gold Miner and Stochbars Strategy - Forex Strategies - Forex



FSR (Monday, 27 January 2025 19:10)
Hi, free download above.
Alvertus (Monday, 27 January 2025 19:05)
Hi how much fot the spke detector?